

Training Module:
ODX
The Operational Data Exchange facilitates the configuration of data sources and transfer of data into the ODX Storage

Table of ContentS
- Key Concepts: ODX
- What is Operational Data Exchange?
- ODX Retains Your Data Versions
- ODX: Connect & Explore Data
- Add a Data Source to Desktop
- Data Source Explorer
- Query Tool
- Select Primary Keys
- Override Data Types
- Synchronize Objects (ODX)
- ODX Tasks
- Orchestrate the ODX with Tasks
- Add a Transfer Task
- Execute a Synchronize Task
- View Execution Logs
- Ingest Data On-Demand
- ODX Incremental Load
- What is Incremental Load?
- Configure Incremental Load
- “Subtract from Value” Incremental Load
- Filter Rows
- Manage Query Tables
Key Concepts: ODX
go to Table of Contents
What is the
Operational Data Exchange?
The Operational Data Exchange (ODX) is the primary way to add raw data to your data solution.
Data Source Configuration
1
Opening the ODX Instance in TimeXtender Desktop allows you to configure your data sources like selecting tables & fields for ingestion, identifying primary keys, configuring Incremental load, & scheduling recurring transfers etc.
2
Data transfer
The ODX Server service is remotely controlled from the desktop client to facilitate the transfer of data from the source to the ODX Storage using one of many ADO.net providers or Azure Data Factory. Incremental load ensures only new and updated rows are loaded.
3
raw data Storage
You can configure either an Azure Data Lake or SQL Database for the initial storage of raw data from the source. The ODX automatically handles changes in the source schema by creating a new version of the target table to match, keeping the old version by default (just in case).
TIMEXTENDER
DESKTOP
1

2
ODX
SERVER
3
ODX
STORAGE
ODX retains your data Versions
Unless you setup a task to remove older versions of the data, then every load is kept in your Data Lake or SQL storage. This is why we say, “The ODX never forgets!”

When new information feeds into ODX from various sources, it tucks each load gently away in long-term storage, ideally in a data lake. This means if users ever need to revisit past data, it remains nestled safely where ODX left it. Unless removal of older loads is specifically requested.
To free up some storage space by removing previous data versions, the User must configure a Storage Management Task, please check out Tasks in ODX Instances.
ODX: Connect & Explore Data
go to Table of Contents
Add A DATA source To Desktop
Select one of the Data Source Connections you created in the portal to use in TimeXtender Desktop.
- Right click Data Sources > Add Data Source
- Enter Name: Adventure Works
- Enter Short Name: AW
- Click next
- Select the data source connection Adventure Works
- Click next
- Check the option for All Tables in the Data Source
- Click next
- Select No, I'll add a task later
- Click Finish


The Short Name cannot be changed after it is saved.
Data Source Explorer
The Data Source Explorer is another vital resource that enables you to explore your data source tables & fields as well as examine your data source configuration and verify all your rules have been applied properly.
- Right-click the Data Source > Data Source Explorer
- Check the box: Included in transfer task
- Check the box: Incremental load rule applied
- Check the box: Data type override
- Click Search
Query Tool
The query tool allows you to query the data source directly, before transferring any data. This is an incredibly useful tool during the initial data discovery.
- Right-click on the Data Source > Query Tool
- Identify and drag your Table into the Query window
- Click Execute
- Review results
Validate Primary Key
- Execute the following Query in the Query Tool:
SELECT
COUNT(*) AS [RowCount],
COUNT(DISTINCT [BusinessEntityID]) AS [DistinctBizEntityID]
FROM [HumanResources].[vEmployee]
This Query determines the number of rows in the Table and compares it with the number of distinct Primary Key Values
Select Primary Keys
A Primary Key is a field or set of fields which uniquely identifies each record in a table. In TimeXtender, a primary key must be identified on the tables you wish to enable incremental load. TimeXtender will automatically identify primary keys during Synchronize task execution on supported data sources.
- Right-click on a Data Source > Set Up Primary Keys
- Select a table without a Primary Key
- Click Override
- Identify and Select the Primary Key
- Click OK
- Repeat as necessary
You can also identify primary keys on many tables at once by adding your own rules.
Override Data Types
When loading data from one data source to a storage of a different type, it's common to encounter incompatible data types. You'll typically see this appear as an error in the execution log. With the Data Type Override feature you can quickly convert data types across an entire data source.
- Right-click the Data Source > Override Data Types
- Click Add
- Convert From
- Data Type > Contains (ignore case)
- In the textbox enter: Money
- Convert To
- Data Type > Float
- Fractional Digits enter: 53
- Click OK
Synchronize Objects (ODX)
Synchronize objects in the ODX identifies Data Warehouse instances that are impacted by structural changes in the ODX. Please check out Synchronize Objects for more information.
- Right-click the ODX Instance, and select Synchronize Objects
- TimeXtender will identify columns affected by any changes in metadata
- Fix "broken mappings" in Fields column, as needed.
- Click OK
ODX Tasks
go to Table of Contents
Orchestrate the ODX Using Tasks
There are three (3) types of tasks in the ODX Server, to orchestrate and automate your raw data ingestion and storage. Of course, all of these tasks can be configured to the Users' specification, then scheduled and automated, which simplifies the end-to-end scheduling and reliable data refreshes.
Transfer Task
data ingestion from source

Synchronization Task
meta-data structure sync

Storage MGMT Task
data storage clean-up

Please check out Tasks in ODX Instances to learn more.
Add a Transfer Task
Transfer tasks load source data into the ODX Storage.
Configure as many transfer tasks as you need, each with different table selections.
Transfer tasks may be executed on-demand, in the right-click menu, or as part of a scheduled Job.
- Right-click the data source > Add Transfer Task
- Enter Name: Transfer All
- Click next
- Choose the option: Let me Select the Tables
- Click next
- Click Add All
- Click Finish
- Right-click transfer task Transfer All > Execute
Execute A Synchronize Task
When executing the Synchronize Task TimeXtender reads the entire schema of the data source, identifying new or changed tables, fields, or data types.
When a source table's schema changes after it's been loaded into storage, this is known as a schema drift and can cause significant challenges when hand-coding. Luckily, the ODX handles this gracefully by automatically creating a new "version" of the source table in the ODX storage and loading the data into this new table. The old version is kept by default but can be archived or deleted later using the Storage Management Task.
- Right-click the Synchronize task > Execute
View Execution Logs
The Execution Log contains details about previously run executions, a vital resource when troubleshooting execution errors.
- Right-click the Transfer Task > View Execution Log
- Note the Status, Start Time, and End Time
You can also see execution logs for all tasks in the application menu:
Reports > ODX Execution Log
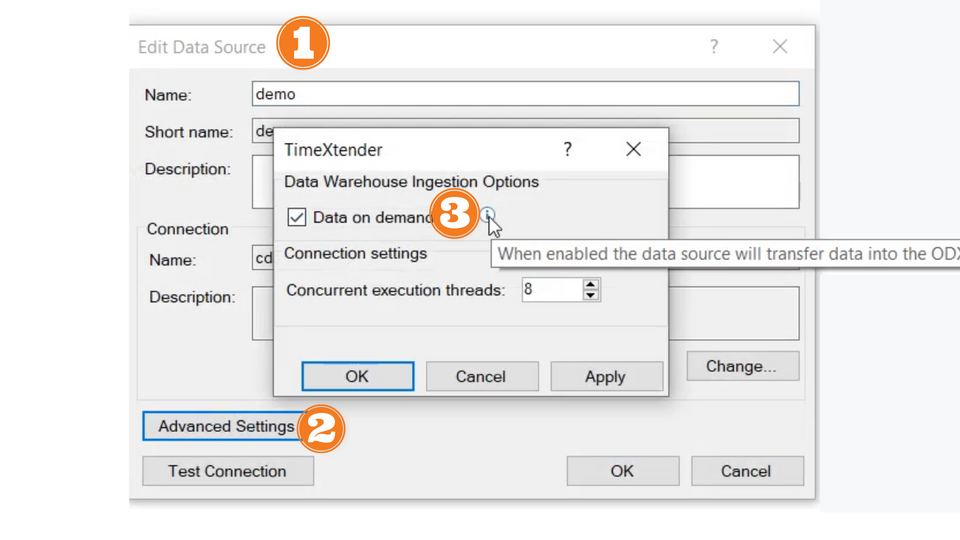
Ingest Data On-Demand
When the 'Data on Demand' option is enabled, the data source will transfer data into ODX storage before the MDW ingests the data. This will work without configuring an explicit ODX Task (i.e. Transfer Tasks, etc.).
Warnings about On-Demand:
- On-Demand feature does NOT currently support ADF data sources.
- On-Demand Jobs do NOT generate ODX Execution Logs, unlike ODX Transfer Tasks
Enable Data On-Demand
- In TX Desktop, right-click the data source and select Edit Data Source
- Click on Advanced Settings
- Check the box Data on demand
- Select OK (or Apply) to close Advance Settings pane
- Select OK
ODX: Incremental Load
go to Table of Contents
What is
Incremental Load?
Incremental load saves significant time and resources by only loading the new and changed source records.
To support this, TimeXtender requires a reliable Primary key and an Incremental value column. The Incremental value column is a field on the source table that contains information, often a date, indicating when that row was created or changed,
1
INITIAL FULL LOAD
The first execution after Incremental load is configured loads all available rows in the data source.
2
IDENTIFY MAX INCREMENTAL VALUE
TimeXtender will then find the largest incremental column value in the source and store this for the next step.
3
incremental load
Subsequent loads will only transfer the rows where the value in the incremental value column is greater than the previous max value.
configure Incremental Load
By leaving the schema and table selections to <All> the rule will apply to all Schemas and Tables.
- Right-click the Data Source > Set Up Incremental Load
- Click Add
- Column > Equals (ignore case)
- Enter: ModifiedDate
- Check box: Handle Primary Key Updates
- Click OK
- Click Refresh
- Click OK
Handle Primary Key Updates ensures that records that match a previously loaded primary key will be updated in the Data Warehouse Instance
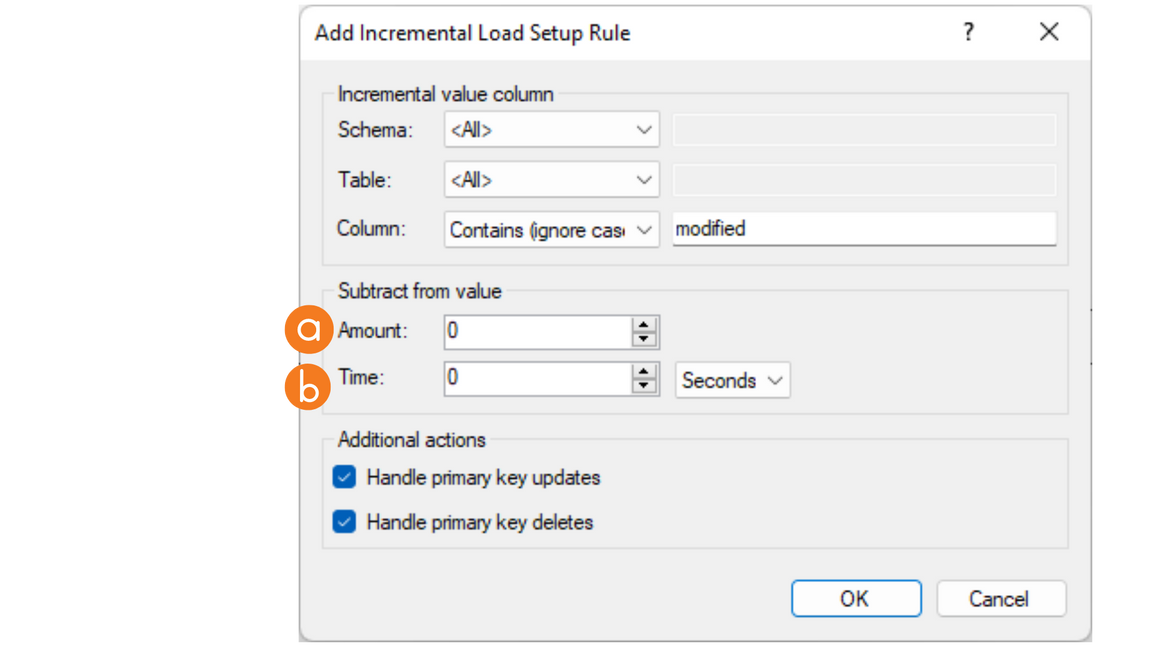
"Subtract from Value" Incremental Load
"Subtract from value" subtracts from ruled fields. Offset rules help with date/time fields. Incremental loads update by created date if altered within the interval.
- Amount decreases a value.
- Time subtracts from the last DateTime (in seconds).
For more information, please check out Incremental Load in ODX.
- Right-click the Data Source > Set Up Incremental Load
- Click Add
- Column > Equals (ignore case)
- In Subtract from value, enter a value to decrement from on each Incremental Load.
- Amount decreases a value.
- Time subtracts from the last DateTime (in seconds).
- Complete the setup, and click OK.
Filter Rows
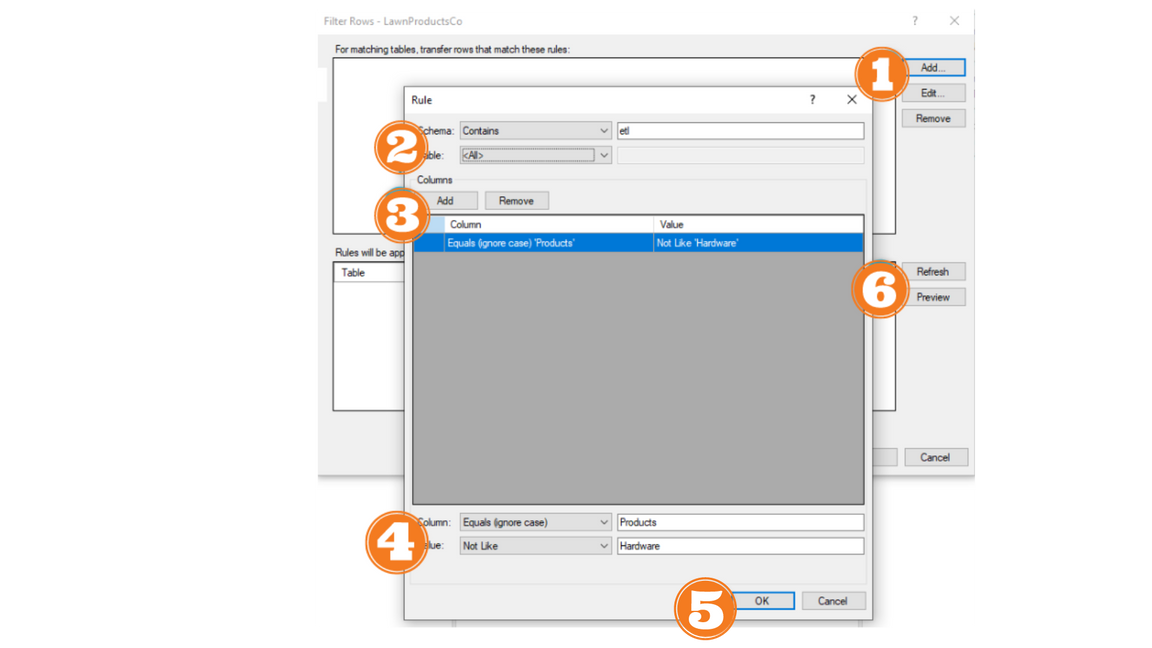
- Right-click the data source and click Filter Rows… then, click Add... to add a new rule.
- In Schema/Table list, click on the operator you want to use and enter the value in the box.
- Click Add to add a new column and value combination.
- In the Column list, click on the operator to use and type the text to match in the box. In the Value list, click on the comparison operator to use and enter a value in the box.
- Click OK
- Click Refresh
Preview the Rows Affected by Filter Rule
(optional) In Filter Rows window, click Refresh to see a list of affected tables. Click Preview to open the query tool with a preset query to see what rows will be transferred from a specific table.
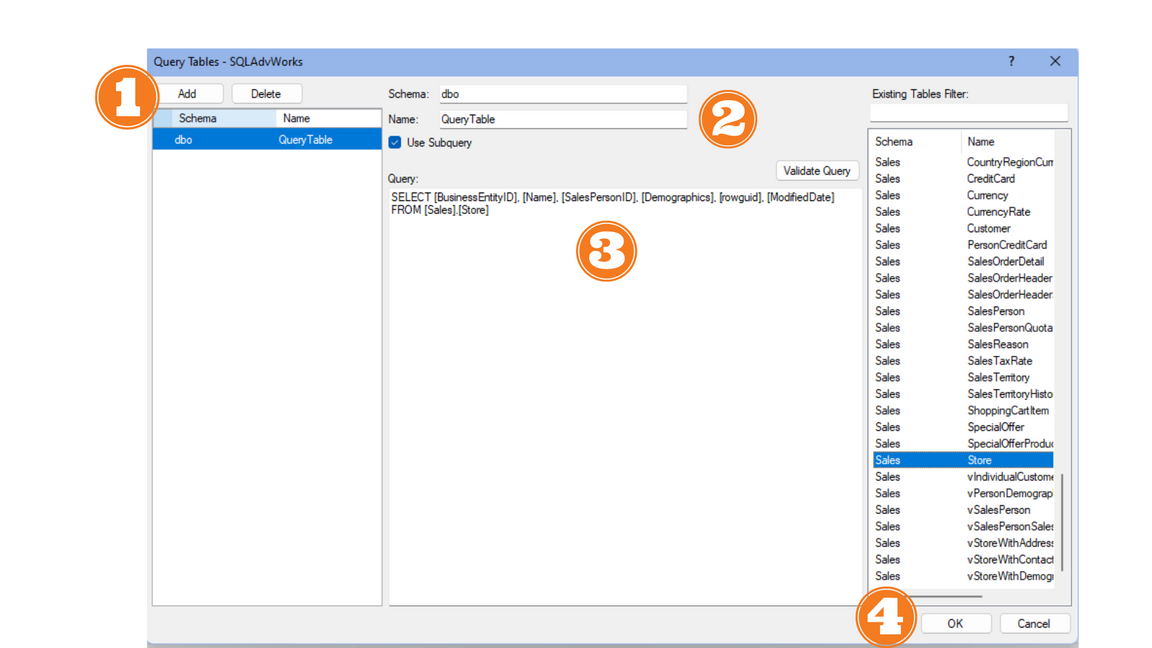
Manage Query Tables
- Right-click the data source and click Manage Query Tables. Click Add
- Enter a Name.
- (Optional) In the Schema box, type the Schema name you want the table to use.
- In Query, type your SQL query to use for creating the table.
- (optional) Click Validate Query to check whether the query is valid for creating a query table.
- Click OK.
- Right-click the data source and click Select Tables, and ensure that the new query table is selected.
- Execute the synchronization task for the data source.
- Add the query table to a transfer task and then select Execute.
Warning: Row filter rules are not applied on query tables.
Please check out Configure Data Sources for more information.
exercise add a Transfer Task
Use what you've learned so far to complete the following exercise.
- Create a new Transfer task that only includes tables from the Sales schema.
- Execute the Task
- View the results in the Execution Log
Section Quiz...
Planning to take the Solution Architect exam? Then you want to be sure these questions are easy to answer.
What are the 3 main roles of the ODX?
What 2 fields are required to support Incremental Load?
What does the Synchronize Task do?

When you're ready, see Answers Below
Section Quiz Answers
Planning to take the Solution Architect exam? Then you want to be sure these questions are easy to answer.
What are the 3 main roles of the ODX?
- Data Source Configuration
- Data Transfer
- Raw Data Storage
What 2 fields are required to support Incremental Load?
- Primary Key
- Incremental Value Column
What does the Synchronize Task do?
It reads the schema of the data source, identifying new or changed tables, fields, or data types.
want to Learn even more?
Learn even more data loading techniques from TimeXtender Tuesdays

