

Training Module:
JOBS
Jobs are used to schedule transfers and executions for all instance types such as, ODX, MDW, SSL

Table of ContentS
- Key Concepts: Jobs
- What are Jobs?
- Create a New Execution Package
- Using Jobs
- Using Jobs
- (optional) Manage Jobs
- (optional) Enable On-Demand
- Execution Queue
- ODX Execution Queue
- Execution Queue
- Object Dependencies
- PowerShell + Jobs
- What are External Executions?
- (optional) External Executions (PowerShell)
- (optional) Example PowerShell Scripts
- Jobs API Endpoints
- What are TimeXtender API Endpoints?
- (optional) API Endpoints & Postman Collection
Key Concepts: Jobs
go to Table of Contents
What are Jobs?
Jobs are the way to schedule and automate tasks and execution packages for
Operational Data Exchange (ODX), Data Warehouse (MDW), and Semantic Model (SSL) instances.
types of JobS in TimeXtenDer
1
Jobs to Schedule ODX Tasks
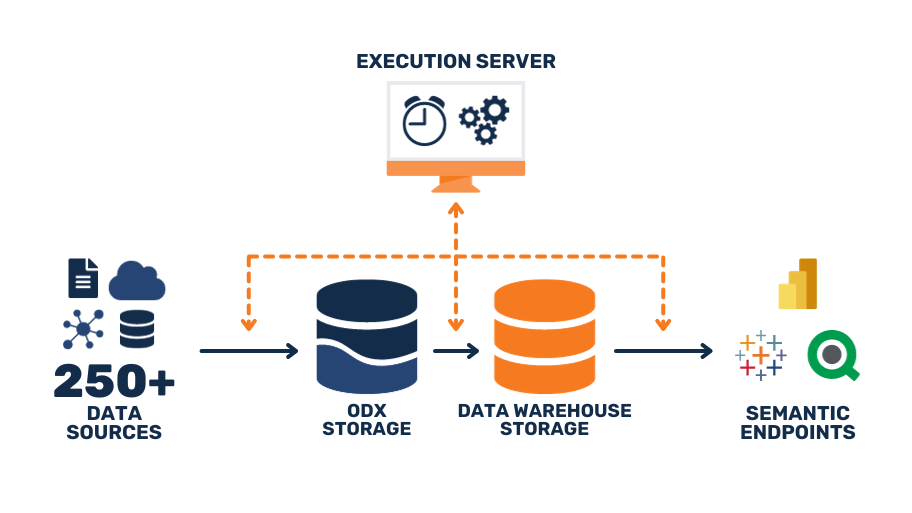
For ODX instances, jobs are used to schedule tasks, transfer, synchronization, and storage management.


ODX TaskS
Schedule
When to Use: to schedule ODX Tasks and update the raw data stored in your data lake or on-premise SQL Server Storage.
For example, scheduling the ODX (only) is ideal for Incremental Loads, large table transfers to be scheduled outside of busy hours, and Storage Clean Up Tasks.
Learn more about Tasks in ODX.

Transfer Tasks load data

data sources
ODX Storage
2
Jobs to Schedule Execution Packages (and more)
For Data Warehouse and Semantic Model instances, jobs are used to schedule execution packages. This uses Data On-Demand, rather than ODX Tasks.

ExecutioN Packages
Schedule
When to Use: to schedule end-to-end data refresh (i.e. ODX, MDW, SSL, and Semantic Endpoints)
For example, using jobs to run Execution Packages are perfect for “refreshing” a dashboard with the latest data especially with the “Data On-Demand” feature.
Learn more about Execution Packages and Data On-Demand.
Please check out Scheduling Executions using Jobs to learn more.
Create A New Execution Package
An execution package determines which objects in an instance will be executed and how.
Create aN Execution Package (MDW)
- Under Data Warehouses, right-click Execution, then click Open
- For Semantic Models (only), right-click Execution under Semantic Models, then click Open
- Right-click Execution Packages, then click Add Execution Package
- Configure the new Execution Package
- Add Name
- Increase Max Threads to desired number, based on your environment and processing power
- Change Managed Execution to “ExecutionTime”
Edit aN Existing Execution Package (MDW)
- Right-click the Execution Package to configure, and select Edit Execution Package, or
- Make the desired modifications to the package, and select OK.
For more details about the Execution Package configuration options, please check out Configuring Execution Packages
Using Jobs
go to Table of Contents
Using JobS
Since there are essentially two (2) types of Jobs in TimeXtender, and they are mutually exclusive,
meaning that they cannot be combined, nor do they need to be, as the serve different purposes.
for End-to-End Scheduling Automation,
Configure Job with MDW and SSL Instances
- Right-click the Jobs node in the left-hand pane
- Select Add Job.
- Provide a name for the job, click Next, and select an instance for the job.
- Select the Execution Packages to include in the job, then click Add (for each). Click Next.
- Add schedule settings to your preference, and click Finish.
for ODX data Refresh (only),
Configure Job with ODX Instances
- Right-click the Jobs node in the left-hand pane
- Select Add Job.
- Provide a name for the job, click Next, and select an instance for the job.
- Select the ODX Tasks to include in the job, then click Add (for each). Click Next.
- Add schedule settings to your preference, and click Finish.
WARNING: Only tasks relating to one ODX instance can be added to a job. In other words, tasks from different ODX instances cannot be added to the same job.
For more information on tasks, see Tasks in an ODX instance.
Manage Jobs
OPtional
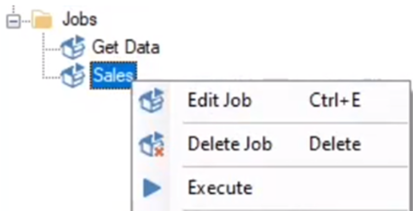
Edit (or Delete) a Job
- Right-click Jobs, and select the action you require.
- Click Edit Job
- Or, click Delete Job
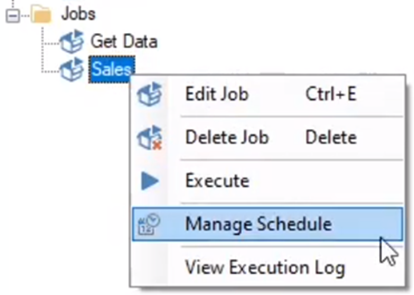
Edit Job Schedule
- Right-click Jobs, and select Manage Schedule
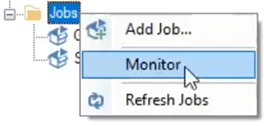
Monitor Jobs
- Right-click Jobs, and select Monitor...
- The Monitor pane shows if a job is valid, the state of the job, its execution state, and the last execution date.

Enable On-Demand
OPtional
What is “Data on Demand”?
Data On-Demand is an advanced setting on a data source, The idea is to simplify data transfers and updates using a single job, without creating or using an ODX Transfer Task*. This means that you will only create the End-to-End data refresh, ensure that you’ve enabled the data source ‘Data on demand’ feature, and schedule the Job.
When to use: to schedule end-to-end data refresh (and “bypass” the ODX tasks and logs).
*Please note: when data is loaded using “data on demand”, the ODX will NOT create log entries, due to the way that the data is queried, “bypassing” the ODX tasks and logs, and allowing for minimal setup and configuration. If you prefer to have ODX execution logs for each data refresh, you should NOT use the ‘Data on demand’ feature’, but rather create two (2) jobs: ODX Job + End-to-End Job. By using these two (2) distinct jobs together, the ODX Execution logs will be created,
Learn more about Data On-Demand.
Enable “Data on Demand” in Desktop
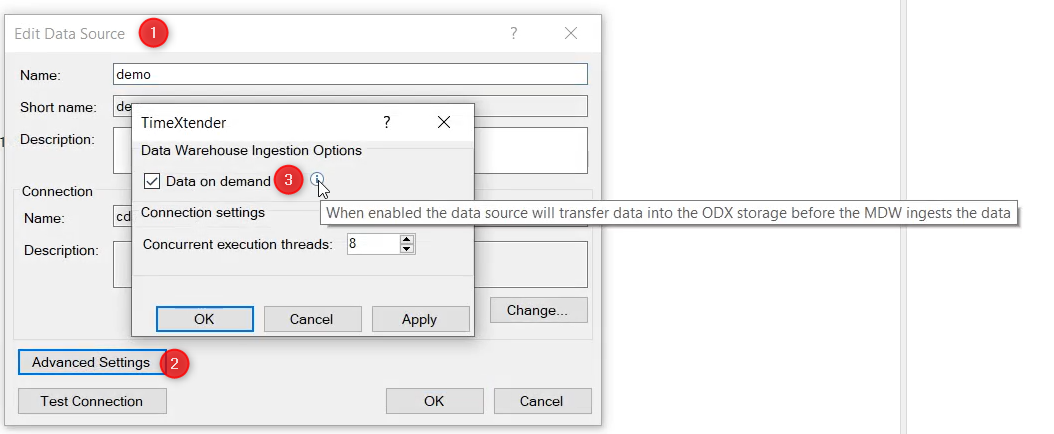
- On TX Desktop, right-click your data source, and select Edit Data Source
- Click on Advanced Settings
- Check the box ‘Data on demand
WARNING: Data on demand does NOT support:
- ODX Execution Logs (see above)
- ADF Data sources
See: Data On-Demand.
Execution Queue
go to Table of Contents
Execution Queue
ODX Execution Queue
- Be sure the ODX instance is open and in the Tools menu, click ODX Execution Queue.
- In the Execution Queue, you can see the tasks that are currently executing, waiting to start or just finished executing.
Execution queue can also be viewed by right clicking ODX Instance-> Select View Execution Queue
Execution Queue
- Right-click on a table or data area and select Execute.
- Check the box - Send to execution queue
Object Dependencies
Object dependencies
- Right click on the desired table-> Advanced-> Object Dependencies.
- In the pop-up select the desired table/view/stored procedure dependency.
- Click OK.
Object dependencies are identified by selecting the tables that should be executed prior to the selected table. This may help avoid a deadlock.
PowerSHell + Jobs
go to Table of Contents
What are External Executions?
What are External Executions?
An "external execution" is a separate program or script designed to carry out specific tasks related to data, which “extends” the native functionality of a program or software offering. By using External Executions, a developer can leverage the capabilities of Jobs + PowerShell to manage infrastructure and storage, advanced data analysis, or more complex operations.
Jobs

Powershell
For example, data engineers may use these external executables to augment and automate data pre-processing or post-processing steps, as a PowerShell script, as a part of a Job in TimeXtender.
- Infrastructure automations like modifying an Azure SQL DB (“sizing”), from scaling-up (for more processing power during peak usage times), to scaling-down (for cost savings during low usage times).
- Analytics & Processing automations like processing an Analysis Services Database (“full refresh), or to Pause PowerBI Embedded.
External Executions (Powershell)
Create & execute an External Executable
- In your Data Warehouse, right-click the Execution and select Open.
- Right-click External Executables and select Add Execute PowerShell Script Step.
- Add Name, select the desired Timeout duration (minutes), and enter the script in the Script pane.
- Click Execute, a message will displayed in the results pane, which will indicate if the script was executed successfully or results in an error.
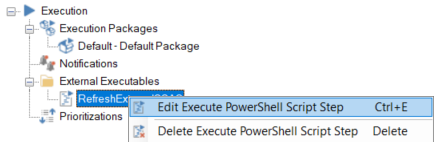
Edit External Executable
- Under External Executables, right-click the script you’d like edit and select Edit Execute PowerShell Script Step.
Add External Executable to Execution Package
- Create a new Execution Package or Edit an existing one. Do NOT modify the Default Execution Package, instead create a new one for the sake of modification.
- In this example, you’ll create a new Execution Package “RefreshSSAS”.
- Click and drag the External Executable to Include Steps. The change will take effect on the next execution of that Execution Package.
Pro-Tip: Best practice is to NOT change the behavior of the Default Execution Package, as this is used when manual executions (i.e. during development tasks), and may have unintended or unexpected consequences for your solution. When in doubt, create a new execution package, or ask your Partner or SSP.
Read more about creating Execution Packages.
Example PowerShell Scripts
OPtional
To see the complete list of example PowerShell scripts, please check out the Knowledge Base article on the topic, Execute PowerShell Script as External Executable.
Here are three (3) examples from that article to give you a preview.

Process
external DB
Example Powershell Script:
Process Analysis Services Database
Invoke-ProcessASDatabase `
-Server "localhost" `
-DatabaseName "SalesOnPrem" `
-RefreshType "Full"

Increase
Processing Power
Example PowerShell Script: Scale Up Azure SQL DB
Set-AzSqlDatabase `
-ResourceGroupName <ResourceGroupName> `
-ServerName <ServerName> `
-DatabaseName <DB Name> `
-Edition "Premium" `
-RequestedServiceObjectiveName "P1"

Decrease Cost
Example Powershell Script: Scale Down Azure SQL DB
Set-AzSqlDatabase `
-ResourceGroupName <ResourceGroupName> `
-ServerName <ServerName> `
-DatabaseName <DB Name> `
-Edition "Basic" `
Jobs API Endpoints
go to Table of Contents
What are Jobs API Endpoints?
The purpose of these API endpoints is to provide a programmatic way to interact with and manage data jobs in Timextender. Jobs API endpoints simplify programmatic access and automation for data estate management and orchestration.
For a complete list of the API Endpoints and parameters, please see the Knowledge Base article, TimeXtender API Endpoints.
Jobs

API
For example, data engineers may use these API Endpoints to augment and automate Jobs-related work. Here are some examples.
- Job Execution allow users to The API endpoints allow you to execute data jobs programmatically. This can be useful for automating the execution of data jobs on a schedule or integrating data jobs with other systems.
- Job Monitoring allow users to to monitor the status and logs of data jobs. This can help you track the execution of data jobs and identify any issues or errors that may occur.
API Endpoints & Postman collection
OPtional
Import Jobs collection
- Download the jobs collection - TimeXtender Postman collection
- Click on import and drop the downloaded collection.
- Open the Public-Jobs to see all the job requests.
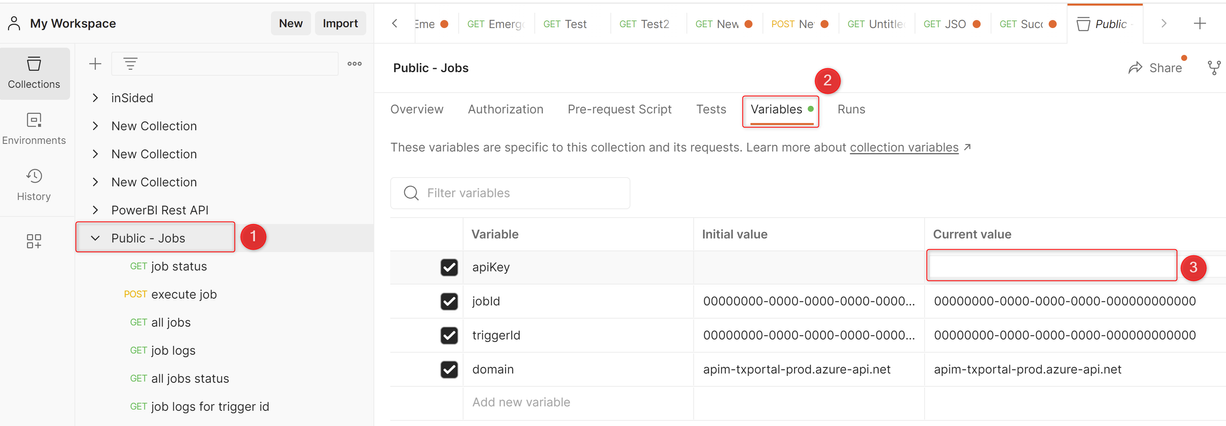
prerequisities
- In Postman, select the Public - Jobs collection that has been imported in the left sidebar
- Select the Variables tab
- Enter the API key in the Current value for the variable apiKey (for more info on how to create an API key see API Key Management)
Get all jobs endpoint
- Enter the domain name in the URL and your TimeXtender generated API Key under the headers tab.
- Click Send, and review Name and save the Job ID
Exercise Schedule SSL Data Refresh
- Right click on Jobs from the Solution Explorer select Add Job.
- Enter the Job Name click Next.
- Select the Semantic Model instance and click Next.
- Select the execution package from the available list and click Next.
- Enter the scheduling information for the job and click Finish.
Section Quiz...
Planning to take the Solution Architect exam? Then you want to be sure these questions are easy to answer.
True or False: You can add tasks from different ODX instances to the same job in TimeXtender.
How many types of Jobs are there in TimeXtender?
True or False: External Executions allow Users to run PowerShell scripts, as part of Execution Packages?

When you're ready, see Answers Below
Section Quiz Answers
Planning to take the Solution Architect exam? Then you want to be sure these questions are easy to answer.
True or False: You can add tasks from different ODX instances to the same job in TimeXtender.
False. Only tasks relating to one ODX instance can be added to a job, meaning tasks from different ODX instances cannot be added to the same job.
How many types of Jobs are there in TimeXtender?
There are two (2) types of Jobs in TimeXtender, for End-to-End Jobs (On-Demand), and ODX-only Jobs.
True or False: External Executions allow Users to run PowerShell scripts, as part of Execution Packages?
True! Users can run PowerShell scripts as part of Execution Packages in TimeXtender through the use of External Executions.
want to Learn even more?
Learn even more data loading techniques from TimeXtender Tuesdays
Congratulations! You've completed the training module
JOBS

